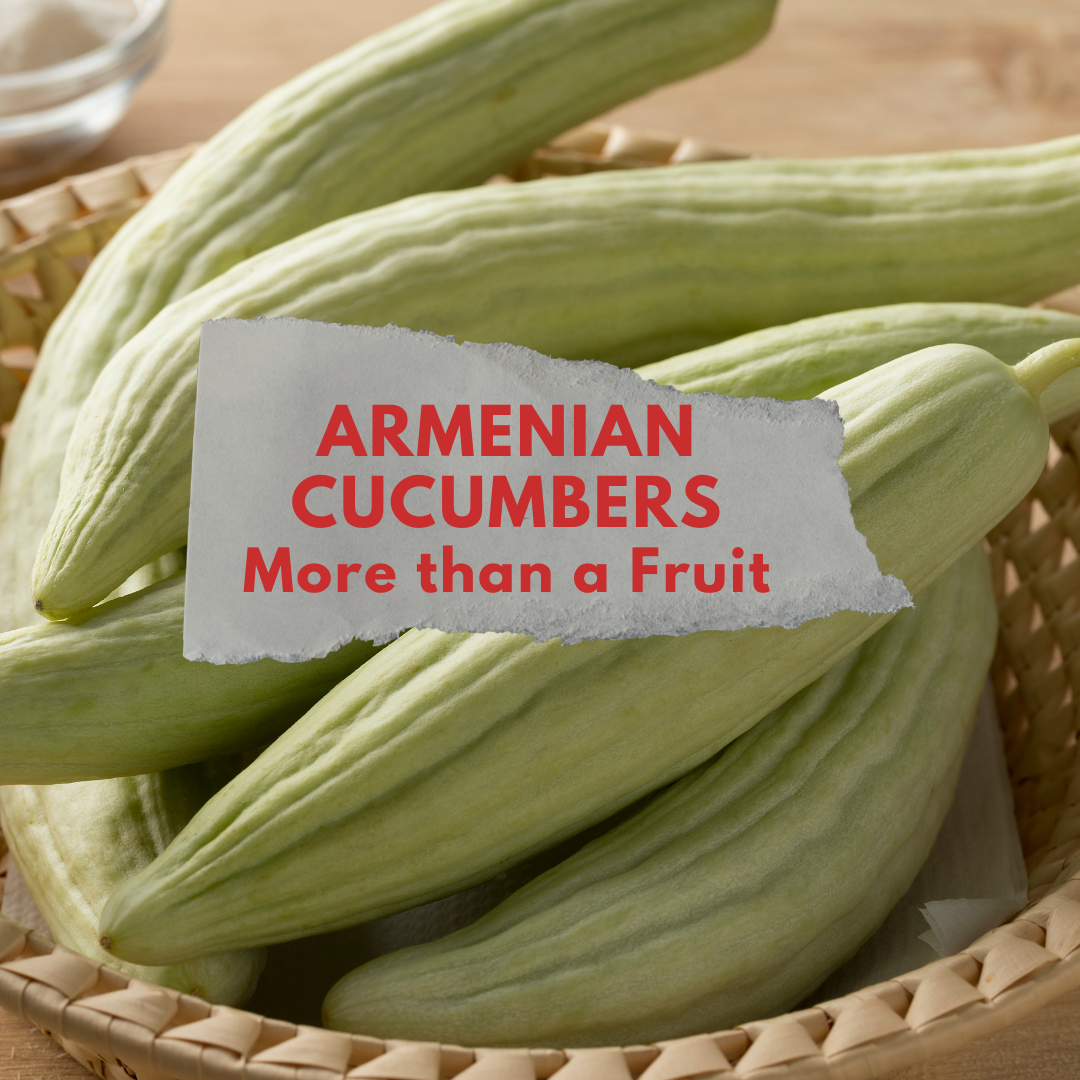
Health

MORINGA: THE MIRACLE TREE

When many of us think of gardens, most don’t consider planting things for medicinal purposes. But it’s something you definitely want to keep in mind when planting your home garden because a medicinal herb garden can help you treat a variety of illnesses and you never know when you might need them!

If you only have room for one, my choice is the Moringa tree.  It’s technical name… Moringa oleifera.

The Moringa tree is probably one of the most important all around medicinal trees.  Some call it a miracle tree because it pretty much helps heal whatever ailments you need to treat.  The benefits are endless… It’s known to improve the immune system, nourish the brain and eyes, lower the appearance of wrinkles, promote energy, act as an antioxidant, among so many other benefits.

According to Moringa Farms, “Gram for gram, Moringa can have three times the potassium you would find in a banana, four times the vitamin A found in a carrot, and seven times the vitamin C found in an orange. Moringa is also rich in minerals, vitamins, essential amino acids, phytochemicals, vegetable proteins, anti-oxidants, anti-inflammatory agents, and carbohydrates.” 

Think about what that means… seven times more Vitamin C than oranges?  So naturally moringa is a great immune booster.  Vitamin C alone is known to help protect against immune deficiencies, helps with colds and flu, aids in wound healing and is great for heart health. Add the huge amount of Vitamin A and you have even more benefits including supporting bone health, maintaining healthy vision, it even helps reduce the risk of acne and reproductive health in men and women. The benefits are truly ongoing!

It’s hard to believe the seeds are supposed to contain genetic information to prevent more than 300 diseases.

That’s hundreds of reasons I use the leaves daily, whether it be in a tea or the leaves being sprinkled throughout my meals. There is so much you can do with moringa leaves… eat them raw or cooked.  You can even dry the leaves to use year-round. I even dry my leaves for moringa powder!

You can find teas and dried leaves online.  

You can also enjoy the benefits by growing your own!!

It’s one of the most resilient trees we own in Phoenix… where the temperatures reach up to 120 degrees.  

When we first planted our first moringa tree, about 11 years ago, it was in a place where it got beat up consistently with my kids basketballs.  But every time we thought it lost its battle, it came back.  Now it’s a huge tree in our garden and it’s definitely fertile.  We have volunteer trees throughout our yard and our neighbor’s yard.

So if you’re thinking of planting a moringa tree, here are a few things to consider:

  • Moringa does not like the cold and loses it leaves in colder climates, when the average temperature drops below 70 degrees.  This doesn’t mean it isn’t feasible to grow in cold climates.  Some people use pots and bring them in when the temperature is too cold; Since they’re subtropical trees, they grow best in warmer climates, USDA zones 8-10. Other than liking warm conditions, it’s not very picky and is pretty easy to grow.
  • Moringa is a resilient tree. It can survive drought conditions.  One of my moringa trees is more than 10 years old, so I don’t water it at all.  It depends on rainwater.  I live in Phoenix, so that means there’s not much humidity in the air and we only get about 8 inches of rain per year.  And the tree is happy, produces gorgeous leaves and pods and is extremely fertile because I now have moringa popping up throughout the yard.
  • It loves the sun! The best location for a moringa tree is a spot that receives full sunlight, typically eight or more hours of light per day.
  • Although moringa plants can survive in poor soil if needed, they thrive in well-drained, sandy soils.  They are sensitive to root rot, so soil that holds too much moisture isn’t ideal.   

After all of that, I still believe moringa is a must-have. If you decide to grow it, you won’t regret it because once established it is actually easy to grow and maintain.  They are low maintenance and require little care.

How to Plant Moringa Seeds

Moringa is a warm-season crop so you’ll want to make sure any risk of frost is gone.

The seeds need warm summer nights to thrive, so keep them at about 60℉, in a location that gets sunlight most of the day.  If they don’t get enough light, it could stunt their growth.

Most gardeners plant them directly in the soil where they plan to keep the tree.  Some say immature seedlings often die when transplanted because they are delicate.  My experience with moringa is that it’s extremely fertile, it sprouts throughout my yard like a weed.  So if it survives that easily on its own, it is definitely feasible even if you don’t think you have a green thumb!

Dig a hole that’s about one-foot deep and wide, then fill it with a mixture of soil and compost. Plant four to five seeds about an inch deep into the hole, keeping the seeds two inches apart.  You can use a finger to push a hole into the soil and just drop in the seeds. 

Next, you’ll want to water the seeds right away. Moringa seeds tend to germinate within one to two weeks.

Keeping them moist will give the best chance of germination, but you don’t want to drown them.

If after watering there is water sitting on top of the soil, you’ve probably watered too much.

Once the trees are established, they are drought resistant.  But until then, the plants and immature trees still need water to survive.  Depending on your climate, once per week is usually sufficient.  I stick my finger in the soil up to my second knuckle.  If it feels dry, it can probably use watering.

When it comes to watering the established plants, infrequent deep watering tends to do better than frequent light watering.

As for fertilizer, one way to save is by using compost.  Just apply a three to four inch layer of compost around the tree regularly; regularly depends on the age of your tree.

Now you’re ready to reap all of the benefits of owning your moringa tree!  You no longer need to leave home for medicine.

And don’t forget to save your pods which are filled with fresh seeds, ready for germination!

Still need seeds?  Check out our Etsy shop for moringa and other medicinal seeds. 

Health

Anise

Wait until I tell you about this wonder herb called anise! 

Anise is a flowering plant in the Apiaceae family with “roots” in Southwest Asia and in the eastern Mediterranean. The seeds and oil from this herb are most commonly used to make medicine, but some people also use the roots and leaf part of anise. You can find or grind your own anise powder as a supplement as well! Anise has a semi-sweet taste and flavor almost like black licorice. This distinct flavor and fragrance of anise is sometimes used in natural soaps, lotions, and perfumes. I even read that the use of anise has been traced back to 1500 B.C. in Egypt!

And guess what?! Anise is a natural remedy for stomach aches and indigestion that can cause uncomfortable gas. The seeds contain an oil called anethole that can aid in food digestion. Anise also stimulates the production of gastric “juices” that make it easier for your body to regulate digestion without causing uncomfortable gas and pain. This powerful herb also contains anti-fungal properties that combat gas build-up and fermentation in the bowels. 

How do you use it?

The most popular way to consume anise is in tea form! You can buy pre-made anise herbal tea from most health food stores, and you can also use the whole seeds to brew tea. Whole seeds can be chewed on their own, but if you’re not a fan of crunchy seeds, then I would recommend brewing a nice cup of anise herbal tea. 

Ground or whole anise seeds can also be added to dough when baking and the extracted oil can be added to beverages for flavor. If you like the taste of licorice, then you will most likely love adding a hint of anise to foods of your choice.

I found ground and whole anise seeds, even powder online and in grocery stores.  But with all of these benefits, why not grow your own.

Here’s what you need to know to grow:

Anise is simple to grow in places like Arizona! To get started, find a location with full sunlight and well-drained soil. Plant the seeds about a half inch deep. You will need to water anise until it progresses into a grown plant (about 6-8 inches high), and then you can gradually reduce irrigation. By this point, it can withstand periods of drought and dry weather, which makes it perfect to grow in desert-like climates! The best time to harvest your anise is when the flowers have gone to seed so that you can collect those seeds, dry them out and save some of them for more planting!

Email us and let us know how you use anise! 

Health

Yarrow

The wound healing, fever reducing herb


Yarrow is a famed medicinal plant native to temperate regions of the Northern Hemisphere in Asia, and Europe and North America. 

The plant compounds are supposed to benefit wound healing, digestive issues, reduce symptoms of depression and anxiety, aid in brain health, and flight inflammation. 

Fun Fact: Yarrow is known for treating nosebleeds by putting a pinch of the plant in the nostril where the bleeding is and blowing it out after the bleeding has stopped fully. 

It’s use as a circulatory system remedy comes from its ability to stop bleeding and move stagnant blood, preventing and clearing blood clots. It tones the blood vessels and lowers high blood pressure.


Dried, powdered yarrow can be used to stop bleeding by sprinkling the wound with yarrow powder or you can use fresh leaves and flowers; just wet them and apply pressure. 

The dried, powdered yarrow can also applied after wounds are cleaned and be used to make wound healing salves.

Here’s a Salve Recipe

Melt around ½ oz of beeswax and mix with at least 4 oz of Yarrow oil and a few drops of any other essential oil if you’d like as well to create a balm like texture to use as a moisturizer, a lip balm, or as a burn salve!


Where do you get Yarrow?


I’ve seen dried yarrow flower, yarrow oil and yarrow tea all over the internet, but you can also grow it to make your own meds!

Yarrow grows best in sunny areas and in well-drained soil. 

To dry your yarrow, hang whole stems in bunches or place them on brown paper in a warm dry place. Allow a few weeks to go by and you will find them dry! Strip the leaves and flowers off the stems and crumble for use in tea. 

Yarrow Tea 

Use 1 teaspoonful of dried yarrow per cup of boiling water, and let it steep for 10 minutes. Strain and drink warm. 

If you are experiencing a cold or a fever you can drink some every two hours or at least three cups a day until you start feeling better. 

For cuts or abrasions use externally as a wash for cuts. 

For a healthy scalp and shiny hair use as a hair rinse. Just take the yarrow oil and mix it with a carrier oil.  Applying it to your scalp is supposed to help stimulate new hair growth.

Other uses for yarrow tea: 

  • Colds and fevers 
  • Scanty menstruation 
  • Heavy periods 
  • Menstrual clotting 
  • High blood pressure 
  • To tone varicose veins 
  • To prevent blood clots 
  • Tension
  • Weak digestion


Where do you get yarrow?

I’m always a promoter of growing your own.  Yarrow likes full sun and although it does best in well drained soil, it will also thrive in poor, dry soils – you just won’t get as big of a harvest.

Health

Fennel

Fennel is a useful and delicious herb to have in your garden. Native to the Southern Mediterranean, fennel is completely edible from the leaves to the seeds. It looks quite similar to an onion but has a lighter and refreshing flavor and many say it even tastes like licorice! And just like onion most people eat it raw, sautéed, roasted, or added to soups and sauces. 

There are a few varieties of fennel but Florence fennel (Foeniculum vulgare var. azoricum) is the type you want to grow if you want to use the stems as a vegetable and use the leaves and seeds as well. 

Medicinal Benefits: 


Fennel can be used to treat mild gastrointestinal disorders, abdominal fullness, intestinal wind, cough and bronchitis, and hernias.

Fresh fennel bulb is a good source of vitamin C, a water-soluble vitamin critical for immune health, tissue repair, and collagen synthesis – Both the bulb and seeds contain the mineral manganese, which is important for enzyme activation, metabolism, cellular protection, bone development, blood sugar regulation, and wound healing.


How to Grow Fennel 

Fennel should be grown where the sun can shine upon it and should not be planted where there is dill or coriander because the plant may cross-pollinate easily and seed production will be reduced. Fennel is self-sowing so if you plant it once, you’ll see fennel every spring! 


How to Eat Fennel 

Raw: 

Closely shave the bulb and marinate it in lemon juice, olive oil, and salt. Eat on its own or add to a salad! 

Sauté it: Heat a medium saute pan over medium-high and then add oil, garlic if you’d like, and of course the fennel (thinly sliced). Season with salt and pepper and as the fennel starts to caramelize, add a splash of water to steam for 1 minute. Remove from the heat. Use as side dish in any meal.

Roasted Wedges: Preheat your oven to 400 degrees and cut the bulb of your fennel into wedges as thin as you’d like. Toss with olive oil, salt, and pepper for 25-35 minutes until the wedges are tender and caramelized around the edges. Enjoy as a snack! 


How To Make Fennel Tea (Especially Good For Digestion) 

Ingredients 

  • 1 to 2 teaspoons freshly crushed fennel seeds 
  • 1 cup boiling water 

Directions: In a teapot, steep fennel seeds in boiling water for 5-10 minutes, depending on desired strength. Strain and serve.

Health

How to use turmeric for healing

I was fascinated when I heard about turmeric and the surprising health benefits it has. Turmeric is a relative of ginger that is yellow-orange in color and is a product of the Curcuma longa plant, which is native to South Asia. This is why turmeric is included in many Indian, Asian, and Middle Eastern dishes! Turmeric is often found in powder form, but you can also find whole turmeric root and turmeric capsules (pills) in some grocery stores. Here’s why turmeric is worth the hype:


Turmeric contains a substance called “curcumin” that has anti-inflammatory properties, and is also what gives turmeric its yellow-ish color! People who have arthritis or other health conditions that cause inflammation in the body have claimed that consuming turmeric helps improve their pain. The Mayo Clinic even says that one study found that taking turmeric 3 times a day was comparable to ingesting a 1,200 milligram dose of ibuprofen! 


The curcumin in turmeric can relieve joint swelling and morning stiffness… get your minds out of the gutter, I’m referring to stiffness in your joints.  So it’s beneficial for those with arthritis and any joint pain.


I enjoy drinking turmeric teas because they help me feel more nimble and improve my day-to-day movement. 


Turmeric has also been linked to helping improve Type 2 diabetes, lowering cholesterol, and shown to stop tumor cell growth in animals. 


However, it is important to note that curcumin in turmeric is not well absorbed in the body on its own. Studies have shown that curcumin has poor bioavailability, meaning that it can’t always be detected in blood and other tissue. Not to worry, there are solutions!


  1.  Black pepper! There is a compound in black pepper, called piperine, that boosts how well your body absorbs curcumin. Piperine can aid digestion and improve headaches and nausea. When combining black pepper with turmeric, it can increase the curcumin that your body will absorb so that you don’t have to miss out on all of its advantages! One study suggested adding 20 milligrams of piperine to 2 grams of curcumin for it to be fully benefiting your body.


  1. You can also use the whole turmeric root. Since it’s not being processed, you don’t have to worry about losing any compounds, making it easier to absorb the curcumin.


  1. Another option is to mix it with healthy fats. The curcumin will bind to fat, making it easier for our guts to absorb it. So cooking with fats like coconut oil, or a smoothie with full fat dairy, almond or coconut milk will optimise the body’s absorption of curcumin… which brings me to one of my favorite ways to use it!


How to use it:

There are lots of ways to consume turmeric!


  • Make a smoothie

One thing I like to do is blend fresh, whole turmeric root into smoothies! It can have a pungent flavor, but when combined with other greens and fruit (especially pineapple) in smoothies, tastes very mild. I use 1 inch of whole turmeric root, which is equivalent to 1 tablespoon of ground turmeric per smoothie.


  • Drink Tea

Another way to get your daily dose of turmeric is to drink a cup of turmeric tea steeped for 3-4 minutes.


  • Spice up your meals

I also love adding about half a teaspoon of ground turmeric to a bowl of soup – it adds a unique flavor and spice. Truly I add turmeric AND pepper to most of my dishes including beans, eggs, even rice.


Because turmeric is a natural blood thinner, some experts suggest not taking it before surgery. If you’re unsure, consult your doctor.


If you have any other turmeric uses or recipes, send us an email and let us know!

If you find yourself trying out some turmeric recipes and make a mess, we’ve got you covered with 3 natural ways to get rid of turmeric stains!

Health

2-Ingredient Facials

The adjustment to life in isolation continues and more and more people are recognizing how convenient and safer it is to be able to make as many things as possible from home. We’re naturally being more self sufficient!


I’m sure you’ve already made your fair share of new dinner recipes but have you tried using some of those same ingredients to wash your face? If you didn’t know you could do that and would like to do one less circle at the supermarket and save some cash, then I have a list of masks, cleansers, and moisturizers entirely DIY:


1. AVOCADO & HONEY FACE MASK:


Avocados are a fabulous source of antioxidants, essential fatty acids, minerals, and vitamins. Honey is known for its antibacterial and antiseptic abilities and being a natural humectant! Those are the only ingredients you’re gonna need! For just one person mash half an avocado and set it to the side. Grab a tablespoon of honey (you can warm it up if you’d like as well) and then mix the two together! I leave it on my face for anywhere between 20 minutes to an hour and then rinse it off. My skin usually feels completely hydrated and when you scrunch your face it doesn’t feel like your skin is cracking. An especially great mask for people with dry skin!


2. TURMERIC & ALOE VERA GEL:


Acne , hyperpigmentation, and dullness are all tackled with this gel. For this gel it is recommended to use Wild Turmeric instead of cooking turmeric as it is safer for skin. Turmeric has healing and antimicrobial properties and also brightens your skin. Aloe vera nourishes the skin and is the base of this combo which will give you that gel texture. Use ½ teaspoon of the turmeric and mix with at least 2 tablespoons of Aloe vera! I usually leave it on for about 30 minutes before rinsing off!


If you have sensitive skin I would suggest testing a little bit of the mask on your hand before applying it to your face to gage your sensitivity to turmeric.


3. BROWN SUGAR & HONEY SCRUB:


Sometimes you have to make a mess to get rid of a mess! That’s a saying right? Exfoliation is key to buffing away any dead skin and allowing your pores to grab a bit of air. Exfoliation helps prevent acne and evens out skin tone. So what are you waiting for? You’ll need a tablespoon of each ingredient, brown sugar and honey. Brown sugar is a lot softer to the skin than regular sugar so make sure you’re using what’s kindest to your face. Sometimes I warm up the honey just the tiniest bit but it’s not necessary. Mix the two and then gently scrub your face in circular motions before washing off.


Do you have any DIY methods of keeping your face looking young and healthy? Send us recipes!

Health

DIY Hand sanitizer

Hand sanitizers are great when it isn’t feasible to wash your hands.

It’s just another step to keep germs and viruses out of our bodies.

But when I look at the ingredients in many of the bottles, my first thought is I don’t want that in my body either.

So I turned to hand sanitizers made with natural ingredients.

The high cost that I would have to consistently pay and really wanting to know what I was constantly putting in my bloodstream caused me to do more research. I found a basic recipe, which i will share at the end of this blog. I took the recipe over to my sister at sofreshsmells.com and we got inspired. We figure if we are going to be using this consistently, we may as well add other benefits, even healing benefits. We played around until we found 3 perfect blends; all of them smell amazing, feel moisturizing and they’re made with natural ingredients. 

One of my favorites is our peppermint blend.

The smell is addicting. And it feels great on my hands. But what I like most are the benefits to the rest of my body.  It’s the included Ylang Ylang essential oil. Have you heard of it?

It’s been known to boost your mood, alleviate anxiety and help with depression.

It’s also supposed to lower blood pressure, help with headaches, fever, even insomnia.

How can you use it? 

Some people apply it to their skin for the calming effects, other people use it in their food, and others include it in their cosmetics… even soaps. We add it to several products including soaps and hand sanitizers.

I promised you a DIY hand sanitizer recipe.

This is a basic recipe. I love that there are so few ingredients.

You can play around with adding other essential oils but do your research first.

All oils do NOT get along.

I’d love to know if you try it out. Send us photos!


DIY HAND SANITIZER GEL RECIPE 

Ingredients

10 drops lavender essential oil

25 drops tea tree essential oil

2 ounces ethyl alcohol 90%+ (180+ proof) or 91%+ isopropyl (rubbing) alcohol

1 ounce aloe vera gel

¼ teaspoon Vitamin E oil

Instructions

Add essential oils and Vitamin E oil to your bottle and mix.

Add alcohol to the oils and mix again.

Next add the aloe vera gel and mix well.

Shake gently before each use. 

Note – always use colored bottles when using essential oils so they are not exposed to light. The sun speeds up the shelf life and changes the oil.

Not feeling confident in your homemaking skills, or just don’t have the time or ingredients to make your own? Try any of our homemade hand sanitizers. They start with the basic recipe, but include other oils for other healing benefits.

sustainability

TOP APPS FOR SUSTAINABLE LIVING

Living sustainably may sound daunting but it doesn’t have to be!  I found six apps sure to cut the work on your behalf substantially. Try out any of these apps and you’ll be on your way to a greener life!

  1. OLIO

A dating app but for the food in your fridge. The OLIO app connects you with people in your area who are trying to reduce food waste.  How? By sharing any over abundance of groceries, cleaning products or anything that could potentially go unused. All you do is take photos of the item you’d like to share and your neighbor’s can connect with you to arrange a pickup time. They have even adapted to the pandemic by adding a safety guide so that you can continue giving your neighbors a hand in the safest way.

OLIO is free and available on iOS and Android.

FUN FACT – Olio is a traditional Spanish stew created in order to prevent food waste.

  1. NoWaste

No Waste almost seems like a second grocery scanner. It literally has a scanner that you use on the barcodes of your groceries to catalog them and be able to access your fridge through your phone. There’s no need to buy anything and if it doesn’t have your grocery in the database you can simply type in the expiration date that way not one thing is lost or gone to waste. When you finish any of your food you go in and note that it has been completely consumed and the best feature it has is the “Consumption” tab that will keep track of the percentage of the food you buy has been consumed and the percentage that has gone to waste overall. A great app if you are looking to hold yourself more accountable in reducing food waste!

Sorry Android users, this free app is only available on iOS right now.

  1. iRecycle

It’s no secret… it’s better for our environment to recycle things versus tossing them in the trash to end up in our landfills.  The problem for many of us is knowing exactly what to recycle and where.

iRecycle makes finding those recycling centers so easy.

It’s a free app that uses your phone’s GPS to find the nearest location to recycle what you are trying to get rid of.

There is a huge list of items, everything from batteries, to hazardous materials, to paper and electronics… some things you never thought to recycle.

Click on the item you’d like to recycle and the app pulls up a registry of locations that recycles the item.  You’ll get the location’s address, phone number, website and a list of what is accepted.

Of all the locations I’ve chosen, the information has been current.  But these days, things can change very quickly.  So to be safe, I suggest calling or visiting the company’s website to ensure the information is accurate.

  1. Seasonal Food Guide site and app

 Seasonal Food Guide is a simple way to know what your body needs right now!  It tells you what foods are in season in your state each month.

Eating food that is in season gives you the best options for taste and nutrition.  Did you know that food contains its maximum amount of vitamins when it’s in season?  It also has more flavor, is better for the community, and has a lower carbon footprint because it doesn’t require as much transportation, refrigeration, etc. to go from the farm to your table.

Back to the Seasonal Food Guide;  it’s a free site and app.

It’s very easy to use; No need to sign up, just choose your state, the month and food you’re looking for.  You can also choose your favorite foods and the site will tell you when they are in season and the best way to choose the food.

For example, ever wonder how to know the watermelon you choose is at its ripest, sweetest moment?  According to the Seasonal Food Guide, you want to look for darker, green melons that feel heavy and sound hollow when tapped.

If you’re considering planting your own food, we have a planting calendar with everything from when to plant what, when to harvest and tips on planting.

  1. Foodprint 

This site is an extension of the Seasonal Food Guide.  It gives you even more insight into your food! It’s like an encyclopedia on the foods you choose, including the benefits, how to choose it, how to cook it, even store it.  Footprint also gives you fun facts, the sustainability of the food and it helps you figure out your “foodprint” and how to reduce it.

  1. . PlantSnap

 Starting a garden or planting trees are at the top of the list when it comes to lowering your carbon footprint.  The trees remove carbon dioxide from the air, store it in the trees and soil, and releases oxygen back into the atmosphere.

PlantSnap helps you identify plants, trees, flowers, even weeds… you’d be surprised at how many nutritious, edible weeds you may have growing right in your yard!

But if you don’t know the names of these greens, you don’t really know how to care for it.

This can also help you figure out which plants are edible and which you should not ingest.

To use the app, just snap a photo or use an existing photo from your image gallery.  The app will give you the best possible matches.

PlantSnap also plants new trees when we share photos!

This app is free, although they do have a paid version that gets rid of ads and avoids the daily snap restriction of 25.  You also need to register for an account to use the app.

If you’d like to start your own plant oasis, we have a planting calendar that shows you the best time to plant your favorite veggies, along with tips to help ensure a successful harvest.

These may all seem like small steps, which is the point of making sustainability more feasible.  I believe that every conscious choice helps get us closer to zero waste and makes lowering our carbon footprint more likely.

What new apps are you using to help you reduce waste?  Email me! I’d love to try them out!

Uncategorized

Society Garlic

The Must-Have Herb for every Kitchen

Is there one herb you can’t cook without?  You use it daily, in all types of dishes.  It’s part of what makes your food so yummy.

One of mine is Society Garlic.  You really can’t find it in stores but you can grow it, with no restrictions… even in a pot.  And let me tell you, once you try it, it’s sure to become a constant in your meals.

You can eat it raw or cooked.  I add it to my salads, beans, stir fry, eggs, stews… you name it.  And often I will cook with it, then add it fresh as well on top of some dishes.

Society garlic is definitely a must-have in my garden.  It’s resistant, grows year round and has gorgeous violet flowers, grass-like leaves.  That’s what I use in many of my meals! I chop them like garlic chives. I like flowers as a garnish… and they’re edible too!

I can’t say enough about this plant… it’s the type of herb that turns bland dishes into masterpieces.  Even more… it has benefits outside of the kitchen.

It’s known to repel mosquitoes, along with lots of health benefits including helping balance your hormones, reduce blood pressure and even help with depression.

What’s your Must Have Herb and Why?  I’d love photos!  Send them to me at [email protected].

Health

Ways to Boost Your Immune Health from Home

Ways to Boost Your Immune Health from Home

It’s a new year and that comes with new opportunities to take care of our bodies in natural ways! How you fuel your body affects everything from your mood and appearance to your overall physical and mental health. In a time where staying home is encouraged to protect the health and safety of everyone in our communities, here are some easy ways to boost your body’s natural defenses without having to leave your house. 

  1. Get outside for some moderate exercise.

Being outdoors when the sun is shining can give your body some much needed vitamin D and along with mild exercise – like stretching and conditioning/toning exercises – can reduce inflammation and promote circulation. Try to step into the backyard for 30 min a day for a light workout.

  1. Consume whole plant foods.

Whole plant foods – like nuts, vegetables, and seeds – are antioxidant rich and can help decrease inflammation. Many fruits and vegetables are also high in vitamin C, which can decrease the duration of a common cold. The vitamins in green leafy plants can boost your immune system and naturally deter harmful pathogens from remaining in your body. You can even grow these whole plant foods in your own garden making it a win for your health and a win for your wallet!

  1. Maintain a healthy sleep schedule.

This one may come as a no brainer, but getting good rest is the key to keeping a high functioning immune system. Lack of sleep has been linked to a higher susceptibility of illness and fatigue. Try having a cup of passion flower or chamomile tea before bed. An antioxidant called apigenin in chamomile can decrease anxiety for a better night’s sleep.

  1. Stay hydrated.

Water can help flush your system of germs and bacteria. In fact, not drinking enough water can lead to some serious problems including headaches, cramps, low blood pressure, seizures, even organ failure. The Mayo Clinic recommends drinking about 3.7 liters of fluids a day for men and 2.7 liters for women.  You can also “eat” your water! Foods like melons, peaches, cucumbers, tomatoes, spinach, oranges are great hydrating foods.

Incorporating these things into your daily routine at home may help you notice an improvement in the way you look and feel. You can use what you already have at home to make these changes!